Guide: Get started with Reaper
Reaper is a fully fledged DAW (Digital audio workstation) with support for effects and instruments plug-ins. The main features are:
- Create, import, edit and save wave-audio and midi
- Import video and create your soundtrack while you have the video on-screen. Save your video to a number of formats, or export the soundtrack for use in your video editor
While Reaper is less that a 10 Mb download, it’s by no means a simple program. In fact, with its ton of features, it can be extremely complicated. So even though your own creativity is the limit, you should be prepared to face great challenges.
Install and configure Reaper
Here’s an easy to-do-list to get you started with this amazing program:
- Download Reaper and grab the 400 page manual at the same time
- If you don’t have an ASIO-driver on your system download Asio4all
- Download Piano One. Even if you’re on a 64 bit system, choose the 32 bit version. That way you can use patches etc. made for 32 bit
- Download ffmpeg-dll-85761ef—.exe
- Create a folder on your D:, E: or F: drive. Call it eg. “My VST plug-ins” – (If you image your C-drive, you don’t want those extra Gb from the plug-ins to increase the size of the image)
- Extract Piano One including the subfolder to “My VST plug-ins”
- Create a free account at KVR and download the latest Piano One update
- Extract the new Piano One dll file to “My VST plug-ins” – overwriting the old one
- Download “DSK DrumZ – AkoustiK”, and extract the files to “My VST plug-ins”
- Install Asio4all
- If you have an external midi/audio keyboard connect it to the PC and turn it on
- Install Reaper
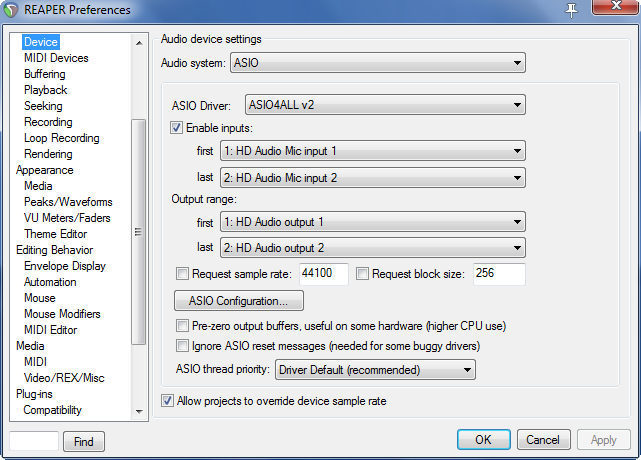
- When Reaper starts up, you’ll be asked to select the audio device. Click yes. In the configuration for Audio device in Reaper choose ASIO as audio system
- Click on Asio configuration an drag the Asio buffer size to eg. 96 samples
- You’ll have to fiddle a little with this to get the best result; so take a note
- It’s a balance between latency and distortion, and different for each system - To the left in the configuration click on the Audio MIDI device double click on your external keyboard and place a mark to enable input and control messages. Click ok to remove the window. Below, in the Midi output make sure Microsoft GS Wavetable synth is disabled
- Scroll down to the Plug-ins VST section. Click on Add, and navigate it to “My VST plug-ins”
- Click on Apply and ok . Click on the About window. Click on Still evaluating and close Reaper
- Extract ffmpeg-dll-85761ef—.exe and
- Copy the files:
avcodec-(no.).dll
avformat-( no.).dll
avutil-( no.).dll and
swscale-( no.).dll to the Reaper installation folder
Aaannnddd, you’re goodd to go!
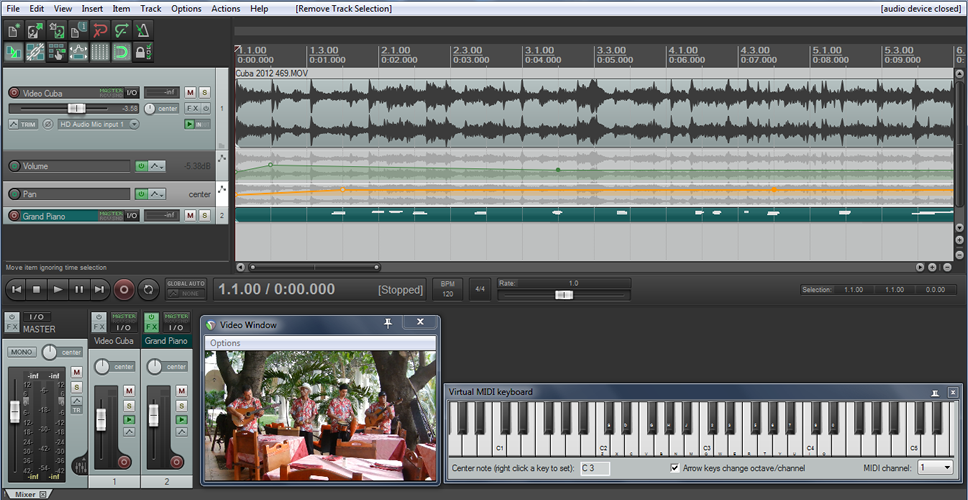
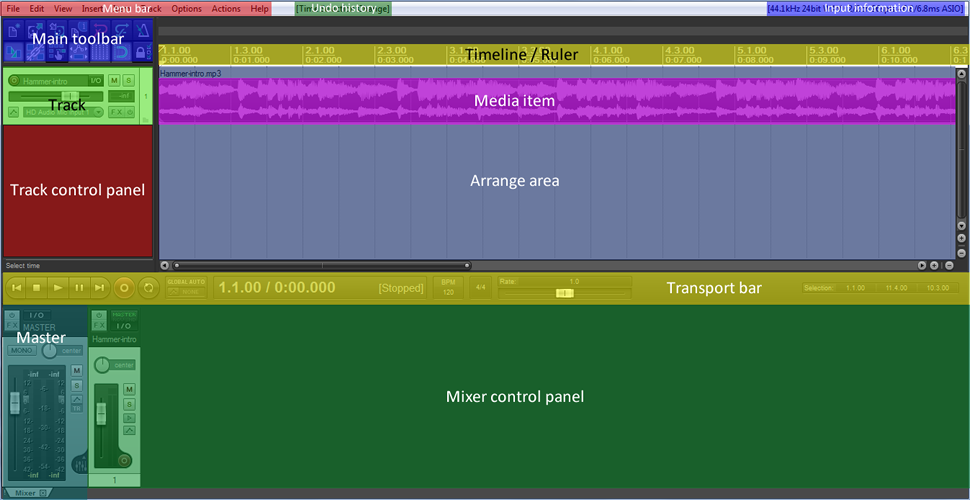
Video soundtracks and the Reaper interface
The first thing you should do is to get acquainted with the Reaper interface.
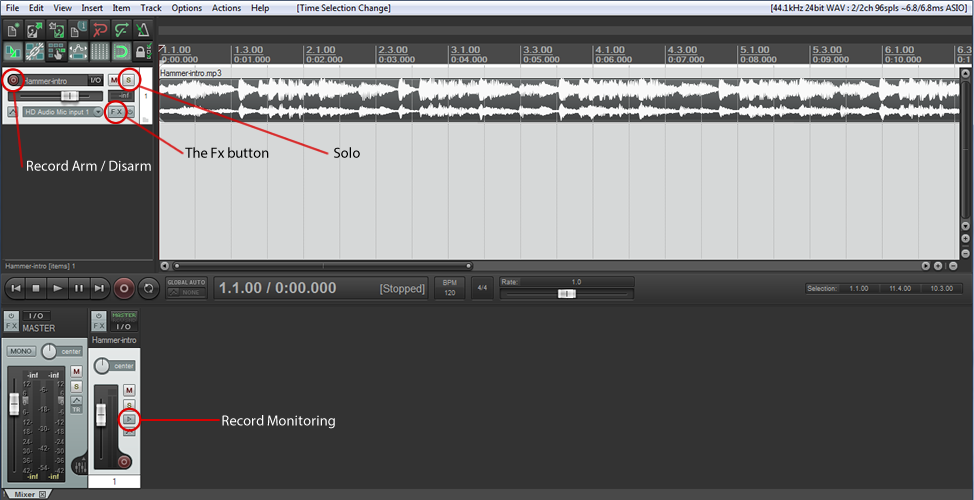
Beside that you should take special note of these 4 buttons
| Button | Action |
| Record Monitoring | Set it to “ON” to get sound output |
| Record Arm / Disarm | To record on the track it needs to be armed. This can be automated (Menu bar: Track … Set all tracks to automatic record-arm when track selected): However, you should be aware that this doesn’t disarm a previously armed track |
| Solo | To hear only a specific track(s) |
| The Fx button | To apply effects and instruments to the track |
Create / edit a video soundtrack in Reaper
| Action | How | |
| 1. | Import video into Reaper | Drag the video from either Windows Explorer
Or Media Explorer (Ctrl + Alt + x) to the Arrange area |
| 2. | Open Video window | Ctrl + Shift +v or
Menu bar View … Video Window |
| 3. | Create / edit the soundtrack | Use the techniques described below |
Record audio in Reaper
| Action | How | |
| 1. | Insert a new audio track | Ctrl + t
Right click in the Track control panel and choose Insert new track or Click on Insert in the in the Menu bar and click on Track |
| 2. | Prepare the track for recording | Click the Record Armed button |
| 3. | Ensure sound output | Check that Record Monitoring is set to ON |
Edit audio in Reaper
Basically you can edit the audio in 3 different ways
- Adjust the parameters of the soundtrack (Volume, pan etc.)
- Add a virtual effect to the soundtrack
- Move, copy, delete, loop, split etc. the soundtrack
1. Adjust the parameters of the audio in Reaper
| Action | How | |
| 1. | Prepare the parameter for Automation | Click the Track envelope / Automation
Put a mark by the parameter that you want to automate |
| 2. | Insert Keypoints | In the Parameter line of the Media Item, insert Keypoints (Shift + left mouse) |
| 3. | Adjust the Keypoints | Drag the Keypoints to the desired position |
2. Add a virtual effect to audio in Reaper
| Action | How | |
|
|
Basic procedure |
Click on the Fx button (Shift + e) and choose the effect
|
|
|
Let’s try to remove some hiss / noise |
|
| 1. | Record the take | Start or end the take with 5-10 sec. of silence (aka noise) |
| 2. | Mark the silence | Select the silent seconds with the mouse |
| 3. | Put on the silence-effect | Click the Fx button (Shift + e)
Select: ReaFir (FFT EQ+Dynamics Processor) (Cockos) Set the Fx to: Mode: Subtract and put a mark in “Automatically build noise profile” Set Toggle Repeat to ON (on the Transport bar) Click Play and click stop (You now have your noise profile) Remove the mark in “Automatically build noise profile” Close the Fx-window |
3. Move, copy, delete etc. the audio in Reaper
| Action | How | |
|
|
As these edits will effect both Audio and Video you should reserve them for the additional audio tracks | |
| 1. | Split up the soundtrack | Left click on the desired split-point on the Timeline
Press s |
| 2. | Delete a section | Either Click on the selection and press delete or Ctrl + x (Cut) or right click the selection and choose Remove Items |
| 3. | Copy / paste a selection | Ctrl + c and ctrl + v
Ctrl + drag & drop |
| 4. | Cut / paste (=move) a selection | Ctrl + x and ctrl + v
Drag & drop (with snap) Shift + Drag & drop (without snap) |
Record a virtual instrument (midi) in Reaper
| Action | How | |
| 1. | Insert a new virtual instrument track | Right click in the Track control panel and choose Insert virtual instrument on new track or
Click on Insert in the Menu bar and click on Insert virtual instrument on new track |
| 2. | Choose the instrument | Choose your instrument from the FX pop-up.
Eg. Piano One. After choosing Piano One, close the “Piano One x86 bridged” window and the FX Piano One track-window |
| 3. | Ensure sound output | Check that Record Monitoring is set to ON |
| 4. | Start recording | Ctrl + r
Click on the record button |
Edit a virtual instrument (midi) in Reaper
| Action | How | |
| 1. | Bring up the Piano Roll (Midi Take) | Double click on the insertion point in the Audio Item. |
| 2. | Edit the note(s) | Use the mouse to move or adjust the position / length of the note(s).
Select multiple notes by right dragging with the mouse. Adjust parameters for the note(s) by choosing the parameter in the bottom left corner, and reduce / increase the parameter using the staves to the right. If you’ve chosen multiple notes, you can use the mouse to draw a line for the parameter. |
Draw a midi pattern (drums/bass etc.) in Reaper
| Action | How | |
| 1. | Insert a new virtual instrument track | Right click in the Track control panel and choose Insert virtual instrument on new track or Click on Insert in the Menu bar and click on Insert virtual instrument on new track |
| 2. | Choose the instrument | Choose your instrument from the FX pop-up.
Eg. DSK Drumz - AkoustiK. After choosing DSK Drumz - AkoustiK, click YES in Build routing confirmation. Close the “DSK Drumz - AkoustiK x86 bridged” window and the FX DSK Drumz - AkoustiK track-window |
| 3. | Tidy up the Track control panel | Press Ctrl + Shift + m to bring up the Track Manager
Mark the tracks below DSK Drumz – AkoustiK and click on the first marked TCP and MCP dot Close the Track Manager |
| 4. | Ensure sound output | Check that Record Monitoring is set to ON |
| 5. | Bring focus to the track | Click on the track |
| 5. | Create a beat to edit | Click Insert in the in the Menu bar and select New MIDI item |
| 6. | Bring up the Piano Roll (Midi Take) Window | Double click on the insertion point in the Media Item and start drawing your notes. The drums are on the white notes C2 to C3.
To make it a bit easier, you can download the name of the drums here. You can then load the names in the Piano Roll/Midi take-window: File … Customize note names … Load note names from file … Navigate to the downloaded text file |